Did you accidentally delete a file from your Dropbox account and want to recover it now? Like any cloud storage service, Dropbox provides multiple avenues for file restoration, ensuring you have the option to get them back in case of unwanted deletion. This guide will look at various methods for recovering deleted files in Dropbox.
Given that deleting files in Dropbox is easy, you might have inadvertently removed some important files. Dropbox distinguishes between permanent and temporary deletions. When a file is deleted, it is saved in the trash folder for 30 to 180 days, depending on your plan. During this period, you can retrieve the file. Files in the Trash folder can be restored to their original location or permanently deleted.
How to Recover Deleted Files in Dropbox
Depending on whether you have temporarily or permanently deleted a file, there are various methods you can follow to recover it.
1. Using the Deleted Files Option
If you have deleted files from Dropbox, you can recover them from the Trash or Delete Files section. The steps are the same for Windows, Mac, Android, and iOS.
- Go to Dropbox on the web and sign in to your account.
- Click on Deleted files from the left-hand side of the page.
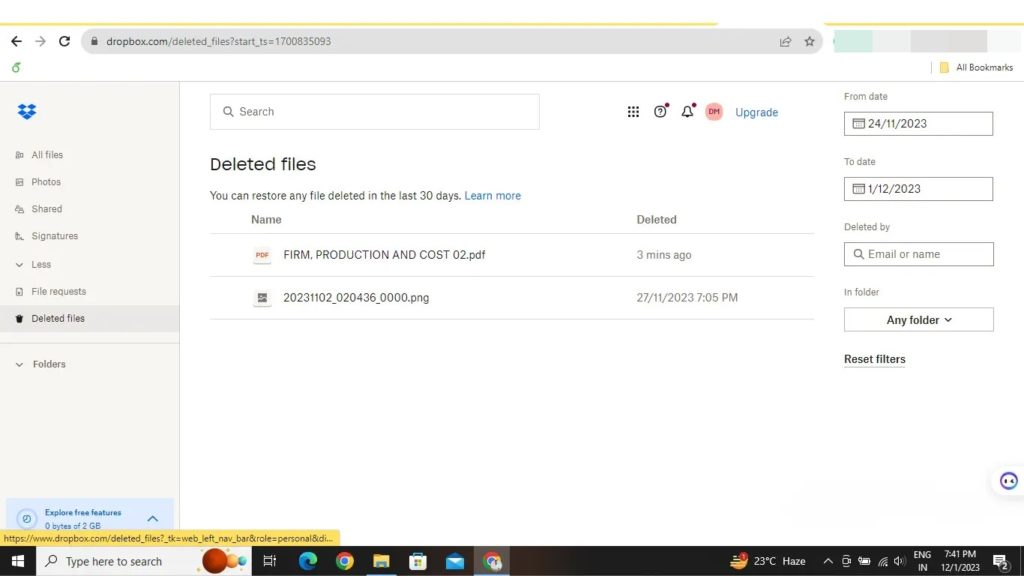
- Please find the file(s) or folder(s) you want to restore and click the checkbox next to it.
- Click on Restore.
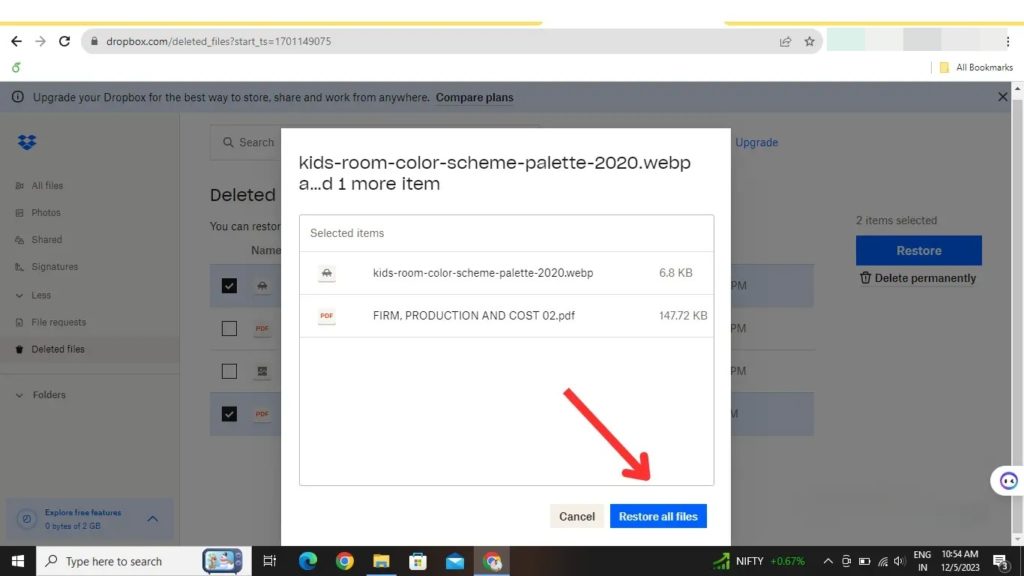
- Select the Restore all files option.
- The files will be restored to their original location from where you can access them
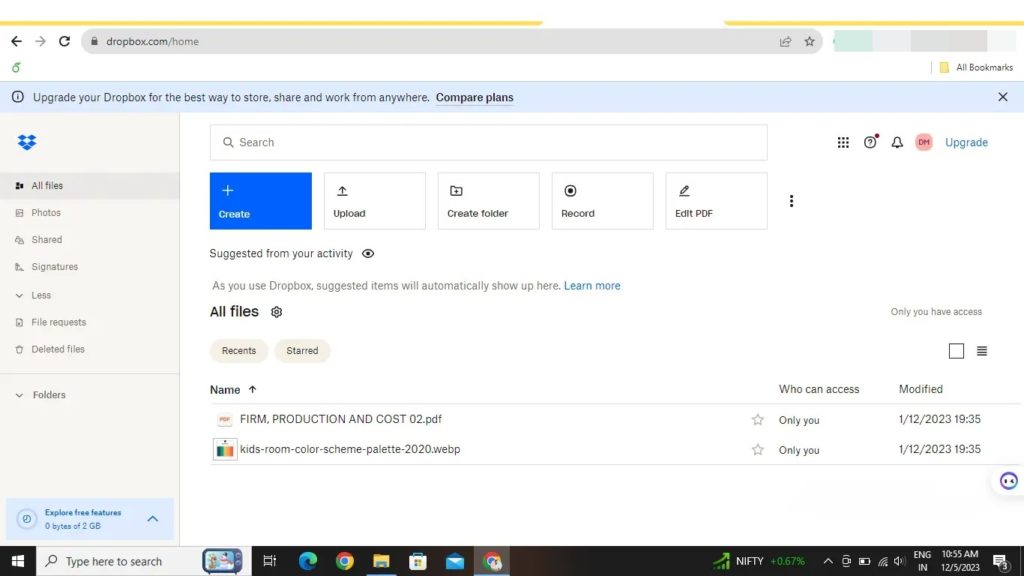
There’s no option to recover deleted files from Dropbox’s mobile app on Android or iPhone. You must follow the above steps from the web. If you have Dropbox syncing enabled on your PC, the deleted files will be automatically synced to the device to their original location.
Do note that you can restore a shared file only if you have “Can edit“ access to it. If you have view-only access to a shared file, you cannot restore it.
2. Using the Events Page
The events page lists all the activities that happen in your Dropbox account. You can leverage this page to recover deleted files.
- Open your web browser and log in to your Dropbox account.
- Navigate to the Dropbox events page.
- Find the deleted file you want to recover and click it.
- Click on the Restore button.
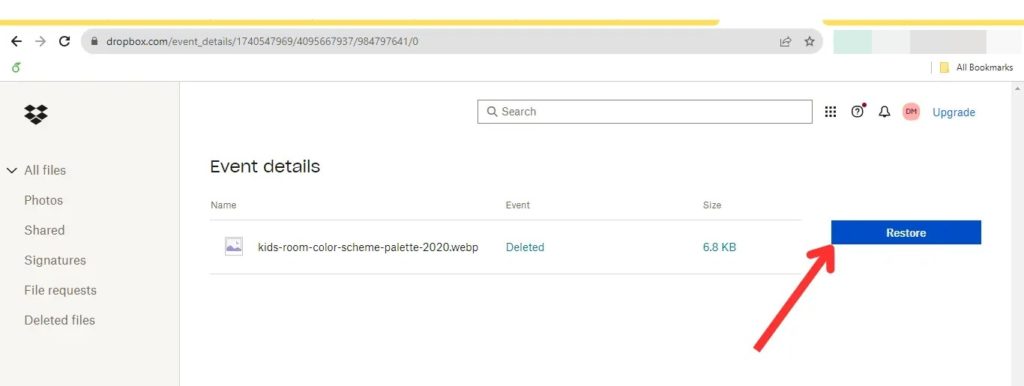
- Click Restore in the pop-up window.
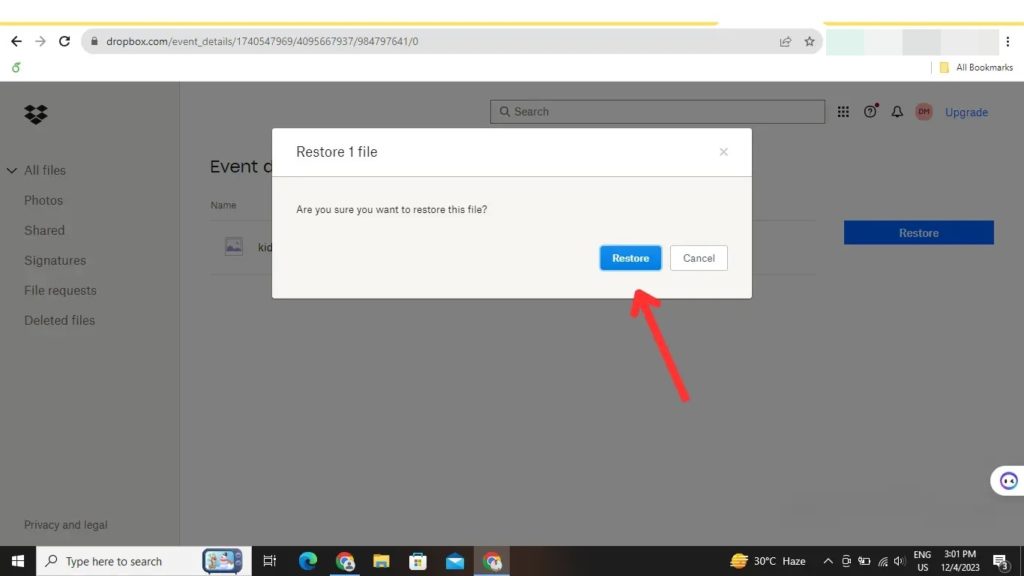
- The selected file(s) will be restored to their original location.
You can select multiple deleted files to recover them all at once.
3. Contact Dropbox Support
Dropbox provides its premium users with email support to recover files that cannot be recovered through usual procedures using a restore link. It comes in handy when you are trying to recover a corrupted file, your account was hacked, and all files were replaced or permanently removed, or when the files have been encrypted because of a virus/malware infection.
Do note that this feature is a part of Dropbox Plus, Essential, and Business plans, which cost $9.99, $18, $20/user per month.
- Log in to your Dropbox account.
- Go to the Dropbox Support page.
- Click the Send an email button.

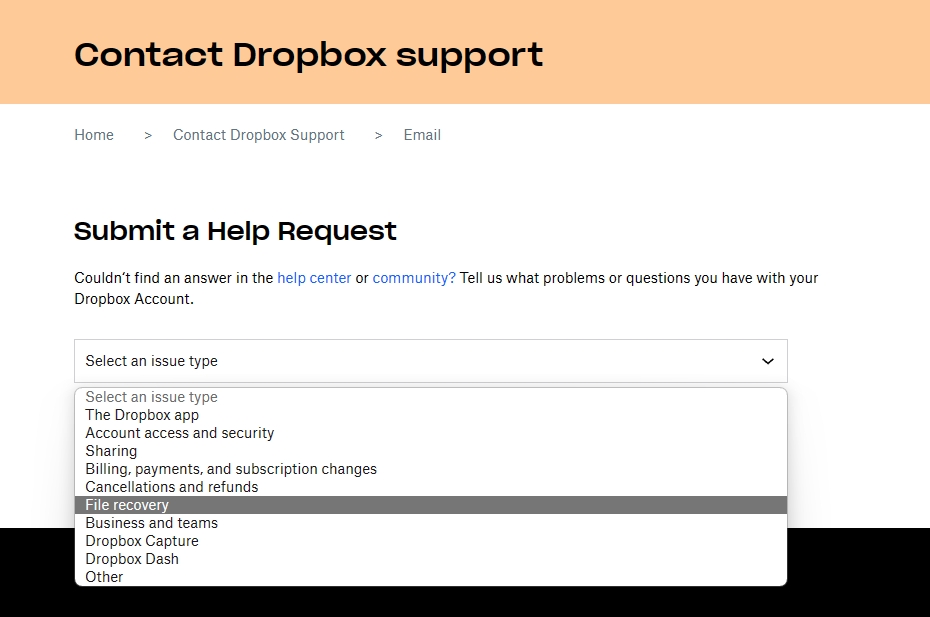
- Select the File recovery option from the Select an issue type dropdown.
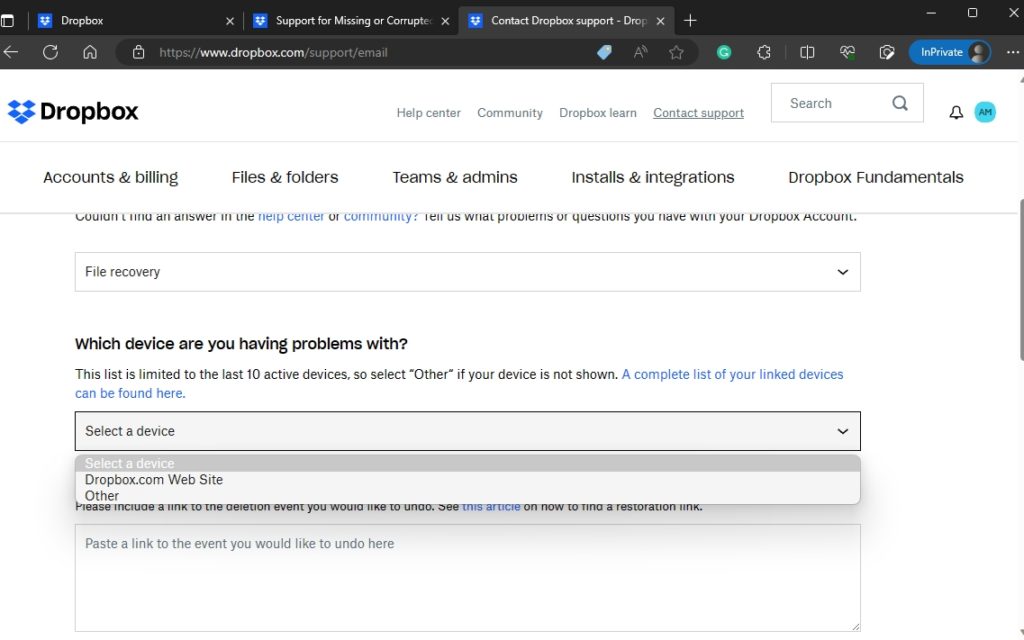
- Click on Select a device from the drop-down list. It can be the Dropbox Web Site or Other (any of your connected devices.)
- Since you must add the event link in the form, go to your Dropbox’s accounts events page.
- Choose an event to be undone or restored, right-click, and copy the link.
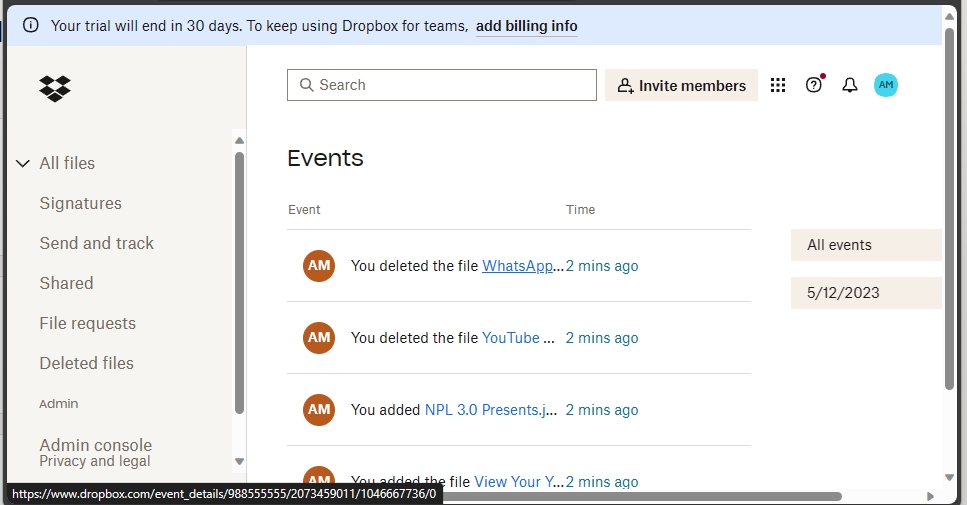
- Copy and paste the link into the Restoration Link in the support email form. If necessary, you can copy and add multiple links.
- Fill in the details in the support email form.
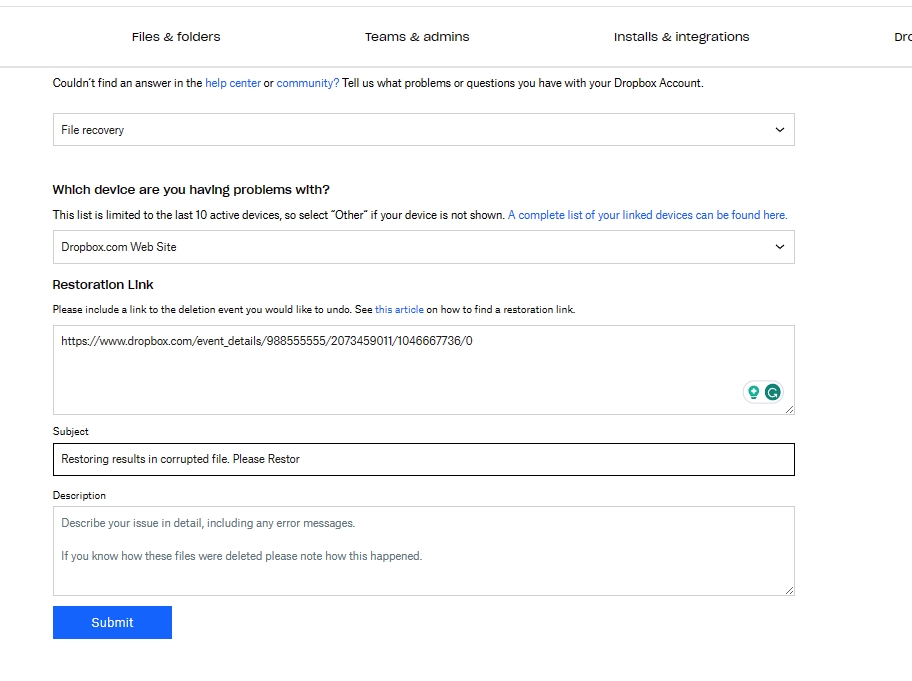
- Click Submit.
In the Events section, you can filter by folder name and choose the event link related to the file you want to roll back or restore. If you want an older file version, you must find its event link.
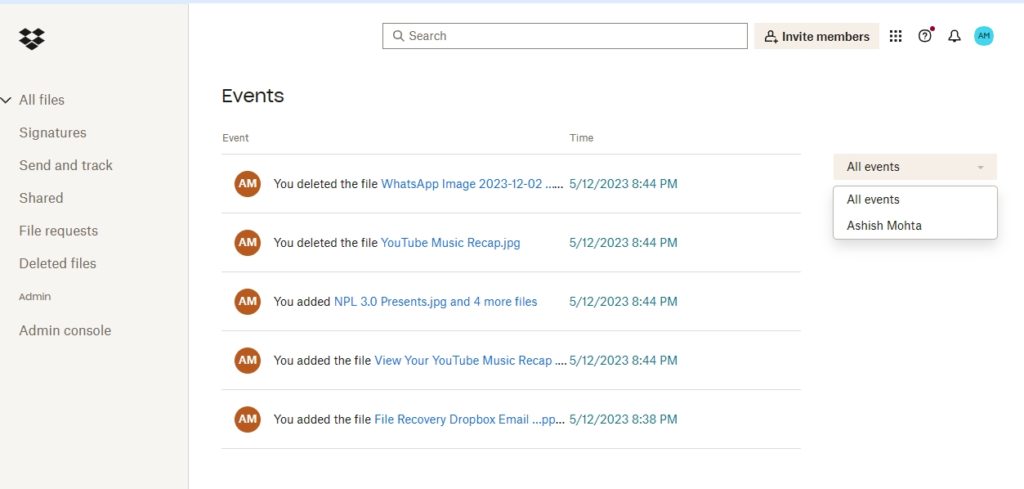
If you are unable to find the restoration link:
When you empty files from Dropbox’s trash after a certain period, the event link related to the file is also removed. In that case, you must provide the support team with details, location, and file type to help them recover the files.
- Go to the Dropbox Support page.
- Click on Send an Email button.
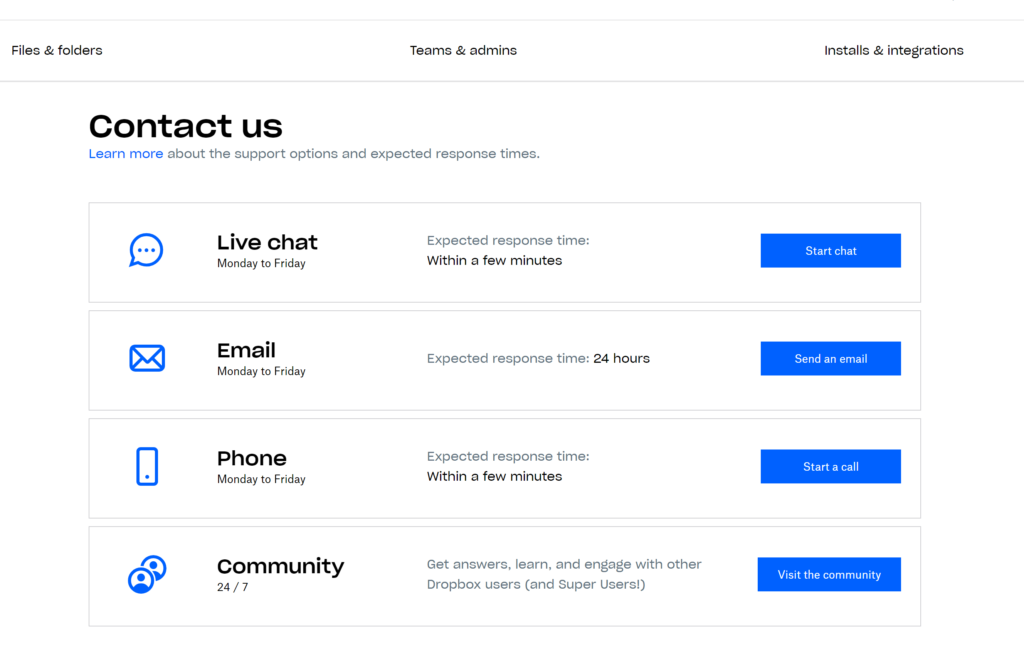
- In the Email support page, select File recovery as the issue type under Submit a Help Request.

- Include the following information in your email:
- If you want to restore one file or multiple or rewind your account to a specific period.
- The data on which the files were affected or went missing. You can provide an approximate date.
- Names of any files and file path to those files.
- Copy and paste the following statement into the description box:
“Yes, I understand what a restoration will do, and I give you permission to take this action in my Dropbox account.” - Send the email.
4. Dropbox Rewind
The rewind feature in Dropbox allows you to restore your account or a folder to a specific period. However, it will not restore permanently deleted files, which is a huge bummer.
Dropbox offers this feature as a part of Dropbox Backup, Dropbox Plus, Family, Professional, Standard, Advanced, and Enterprise plans. You should only use this feature when there is a significant data loss incident.
- To rewind your complete Dropbox account, click the ellipsis icon next to Organize.
- Select Rewind this folder.
- To rewind a specific folder, hover over its name and click the “…“.
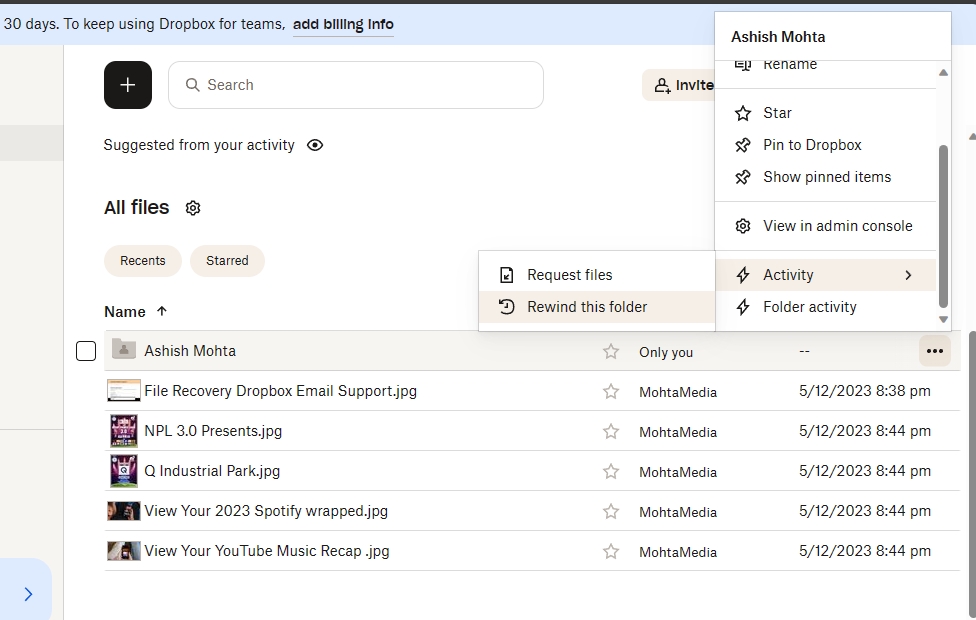
- From the flyout menu, click on Activity and then Rewind this folder.
- Click Try Rewind.
- Choose the date and time you want to rewind your folder to and click Continue.
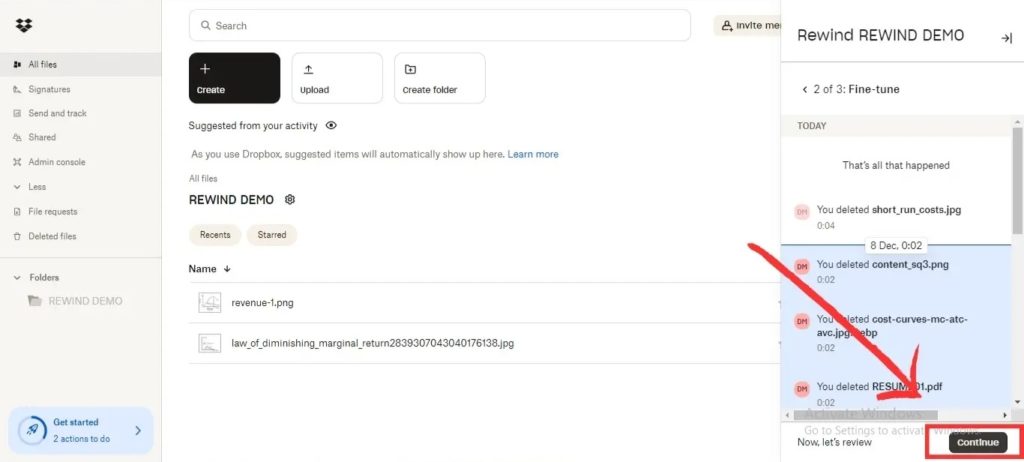
- Choose which events you want to keep and click Continue.
- Click on Rewind.
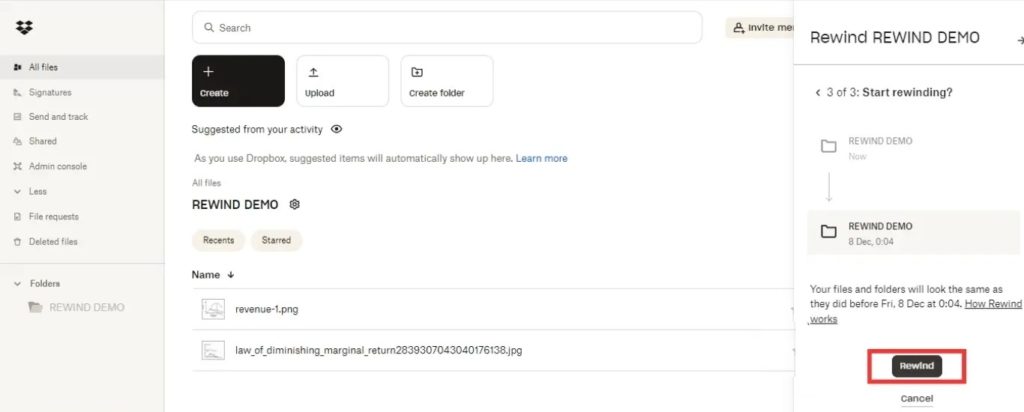
Do note that this will also revert all the folders within that specific folder. If this trick doesn’t work, you can always undo Dropbox Rewind by rewinding your account to a time before the first Rewind took place.
Preventing Future Data Loss in Dropbox
While Dropbox has ways to bring your data back, no one can guarantee it won’t fail. It is best to minimize the risk of data loss in Dropbox and consider adopting these preventive measures, such as
- Enable File Version History: Dropbox records the changed versions of the files. File Version History allows you to revert to an earlier version of the file.
- Utilize the File Request Feature: You should use the File Request feature rather than sharing directly with another person. This enables you to take up the lead in the file and be able to retrieve it quickly if need be.
- Regular Backups: Make sure you back up your Dropbox files on another external hard drive (or use another cloud storage provider). This is an extra protection measure against data loss.
- Team Access: If you use Dropbox Team, restrict file deletion permission to limited people.
Many of these features are paid, and if you are serious about the safety of your data, you should opt for Dropbox Premium and enable the suggested methods. You can also consider downloading all your Dropbox files and folders and creating a local backup.
FAQs
Q: Can I permanently delete files from Dropbox?
A: It is possible to remove files from Dropbox using the Permanently delete command permanently. However, you cannot recover permanently deleted files by following the usual procedures.
Q: What is Dropbox Rewind, and how does it work?
A: Dropbox Rewind is a paid feature that makes it possible to roll back your Dropbox account to a particular time in the past. It comes in handy when you experience severe data loss troubles.








Leave a Reply