1
This article will show you how to Add a Drop Shadow in Illustrator. It is possible that you will need to add type in Illustrator in order to identify parts of your work or even finish them, but this will depend on the kind of project that you are working on specifically. Your project’s typographical elements, whether they are technical illustrations, logos, charts, or simple infographics, can be styled with a drop shadow behind them to make them look more stylish.
This can be done in order to make your project look more professional. Drop shadows give your designs a distinctive appearance while also adding depth to them. Implementing a drop shadow effect in Adobe Illustrator will assist you in refining the details of your designs and bringing them to the forefront. If you want to give your designs some depth and make them look as if they are leaping off the page, adding drop shadows to them is a great way to accomplish this.
In this tutorial, we will show you how to add a drop shadow in Illustrator, whether it be to text, a shape, or multiple objects, so that you can give your designs a multi-dimensional appearance. In Adobe Illustrator, drop shadows can be applied to any aspect of the document, including text. The addition of it to your text is an excellent way to differentiate how to Add a Drop Shadow in Illustrator.
How to Add a Drop Shadow in Illustrator
Using the Effects Panel
- Select the object you want to add a drop shadow to.
- Go to the top menu bar and navigate to Effect > Stylize > Drop Shadow.
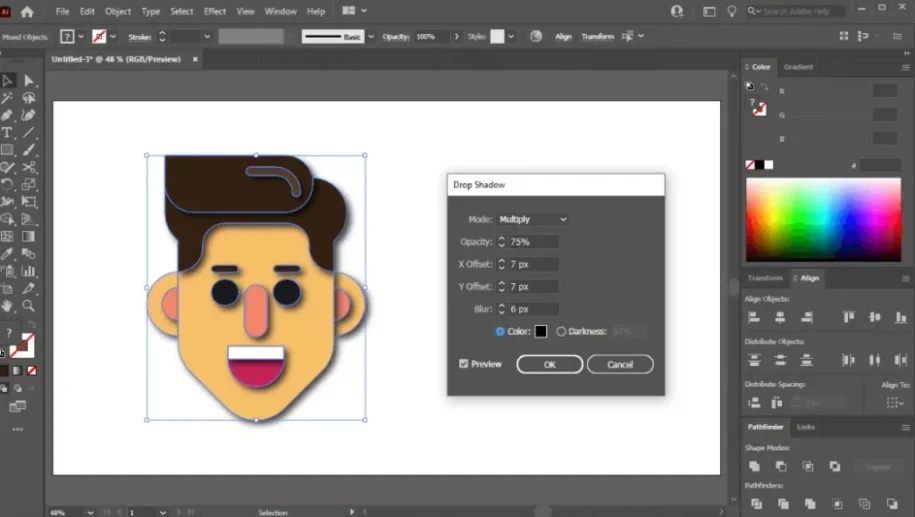
- This will open the Drop Shadow effect window. Here you can adjust various properties of the shadow:
- Mode: This determines how the shadow interacts with the object’s fill color (options like Multiply, Normal, Overlay, etc.).
- Opacity: Controls the transparency of the shadow (0% fully transparent, 100% fully opaque).
- X & Y Offset: These values define the horizontal and vertical distance of the shadow from the object (positive values move the shadow right/down, negative values move left/up).
- Blur: This controls the softness of the shadow’s edges (higher values create a blurrier shadow).
- Color: You can choose a specific color for the shadow instead of the default black.
- Global Light: Enables simulating a light source for a more natural shadow effect.
- Play around with the settings in the preview window to achieve the desired shadow look.
- Once satisfied, click OK to apply the drop shadow to your object.
Using the Appearance Panel (For More Control)
- Follow steps 1 and 2 from Method 1 to open the Drop Shadow effect window.
- Instead of clicking OK, hold down the Alt key (Option key on Mac) and click OK. This creates a new fill effect with the drop shadow applied.
- In the Layers panel (Window > Layers), you’ll see the drop shadow listed as a separate effect under the object’s fill.
- Double-click the drop shadow effect in the Layers panel to access the Appearance panel (Window > Appearance).
- The Appearance panel allows you to further edit and refine the drop shadow properties. You can adjust individual settings, add additional effects on top of the shadow, or change the blending mode for more advanced shadow customization.
Understanding the Importance of Drop Shadows in Graphic Design
- Depth and Dimension: Drop shadows give design elements depth and dimension by making them look like they are floating above or lifted from the background. This gives the impression of realism and helps the viewer understand where things are in a composition.
- Visual Hierarchy: Drop shadows can be used to set up a visual hierarchy by showing which parts of a design are more important than others. Things that have heavier drop shadows tend to stand out or be closer, while things that have lighter or no drop shadows tend to fade into the background.
- Separation and Contrast: Drop shadows help to set objects apart from their background or nearby elements, which raises the contrast and makes the objects stand out more. This separation makes things easier to read and understand, especially in layouts that are busy or complicated.
- Focus and Emphasis: Drop shadows can draw attention to themselves and make a design’s focal point by casting a shadow on them. This draws the viewer’s attention to important parts or messages by emphasising them.
- Visible Cohesion: Drop shadows can be used to make a design look like it flows together by giving different parts of it the same shadowing effect. This helps to connect different parts of the composition and make it look better as a whole.
- Implied Lighting: Drop shadows can make it look like there are lights in a design, which adds to the realism and atmosphere. Different lighting effects can be used by designers to improve the mood or tone of their work by changing the shadow’s angle, distance, and intensity.
Tips and Tricks for Enhancing Drop Shadows in Your Designs
- Consider Light Source: Determine the direction and angle of the light source in your design, and apply drop shadows accordingly to simulate realistic lighting effects. Consistent light sourcing adds to the overall realism and cohesion of the design.
- Use Multiple Shadows: Experiment with layering multiple drop shadows of varying sizes, opacities, and angles to create complex and dynamic shadow effects. This technique can add depth and dimensionality to your designs.
- Apply Gradient Shadows: Instead of using a solid color for the drop shadow, consider applying a gradient to create a more nuanced and visually interesting shadow effect. Gradient shadows can mimic the effects of ambient lighting and add depth to your designs.
- Combine with Other Effects: Experiment with combining drop shadows with other effects such as inner shadows, outer glows, and bevels to create unique and visually striking effects. Layering multiple effects can add complexity and depth to your designs.
- Adjust Distance and Size: Fine-tune the distance and size of the drop shadow to control its positioning and spread. Increasing the distance between the object and the shadow creates a more pronounced 3D effect, while decreasing it results in a flatter appearance.
- Consider Context and Contrast: Take into account the background color and contrast levels when applying drop shadows. Adjust the shadow color, opacity, and blur to ensure optimal visibility and contrast against the background.
- Avoid Overuse: Use drop shadows sparingly and purposefully to avoid cluttering your design or overwhelming the viewer. Reserve drop shadows for key elements that require emphasis or separation from the background.
Conclusion
There are a variety of effects contained within Adobe Illustrator that can be applied to the text in order to make the environment appear more realistic. By way of illustration, you can give the impression that a text has lighting by casting a shadow over it. It is also possible to apply these effects to objects; however, the purpose of this article is to demonstrate how to apply a hard or drop shadow to text in Adobe Illustrator.
Questions and Answers
Can you add a drop shadow to a logo?
When it comes to adding depth and dimension to your logos and text, drop shadows are a straightforward method that is highly effective. There is also the possibility that they will assist in making your designs more readable and distinguishable from the background. The following are some suggestions that will help you make the most of drop shadows: Decide on the appropriate hue.
What is a drop shadow font?
Drop shadows are frequently utilised for elements of graphical user interfaces, such as windows or menus, as well as for text that is relatively straightforward. There are many desktop environments that have a drop shadow applied to the text label for icons on desktops. This effect is used because it effectively differentiates the text from any coloured background that it may be in front of.
Where is effect in Illustrator?
When an object is selected, the effects can be found in either the Properties or Appearance panel, either under the Effect menu or the fx menu button (Figure 15.1). Clicking the fx menu button will reveal the options that are available under the Illustrator Effects and Photoshop Effects categories.
You Might Be Interested In


Leave a Reply