
21
How To Adjust Video Quality in Amazon Prime Video: As more and more of us use streaming services like Amazon Prime Video for fun, it’s clear that they have a lot of different shows and films for everyone. Amazon Prime Video stands out because it has a huge library of films, TV shows, and original material that people of all tastes can enjoy. But if you want to get the most out of it, you should make sure that the video quality works with the way you watch it.
Changing the video quality can make your experience much better whether you’re watching on a big TV, a smartphone, or a computer. Users can customize their viewing experience on Amazon Prime Video by knowing how to change these settings. This is useful whether they want clear images, smooth playback, or to save data.
By learning how to make these changes, Prime Video subscribers can get the most out of their subscription and enjoy their pleasure more. You can really enjoy watching more when you improve the video quality, whether you’re watching a movie or getting up on your favorite TV shows. Here are the steps how To Adjust Video Quality in Amazon Prime Video. If you want to know more information about this visit Amazon Prime Video Official Website.
Why Adjusting Video Quality Matters
It’s important to change the quality of movies because it impacts how much internet data they use and how much fun they are to watch. Videos that are of higher quality look better because they are clearer and have more details. This makes watching them more fun. There are times when too high of quality can make it take longer to run and use up a lot of internet data. This is especially true on older devices or connections that are slower.
This could make the movie buffer or pause a lot, which would make watching it annoying. If the quality is lowered, on the other hand, movies may load and play more quickly and with less data use. It is very helpful in places where you are limited in how much data you can use on the internet or where the connection is weak. When you change the quality of a movie, it’s important to find the right balance.
How To Adjust Video Quality in Amazon Prime Video
On Mobile device (iOS or Android)
- Open the Prime Video app.
- Tap on the “My Stuff” tab at the bottom right corner of the screen.
- Tap on the gear icon in the top right corner to open the settings.
- Select “Stream & Download.”
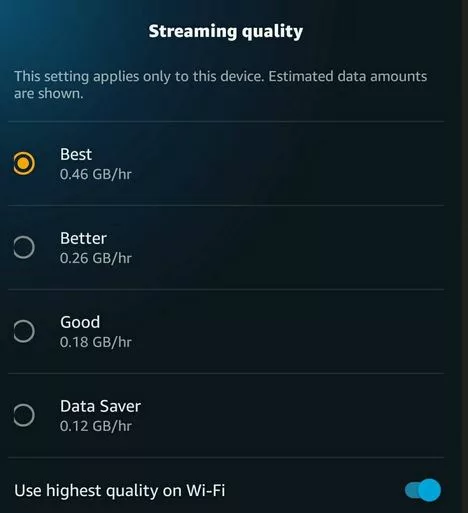
- Tap on “Streaming Quality.”
- Choose the desired quality from the following options:
- Data Saver: This option uses the least amount of data and is best for slow internet connections.
- Good: This option offers a balance between quality and data usage.
- Better: This option provides a higher quality than “Good” but uses more data.
- Best: This option provides the highest quality streaming experience but uses the most data.
- Uncheck the “Use highest quality on Wi-Fi” option if you want to prevent the app from automatically switching to the best quality when connected to Wi-Fi.
On PC
- Open the Prime Video official website.
- Click on your profile picture in the top right corner of the screen.
- Select “Settings” from the menu.
- Click on “Stream & Download.”
- Under “Streaming Quality,” choose the desired quality from the following options:
- Good: This option offers a balance between quality and data usage.
- Better: This option provides a higher quality than “Good” but uses more data.
- Best: This option provides the highest quality streaming experience but uses the most data.
On Fire Stick
- Go to the Settings menu on your Fire Stick.
- Select “Preferences.”
- Open the “Data Monitoring” section.
- Make sure “Data monitoring” is turned on.
- Navigate to the “Set Video Quality” section.
- Choose the desired quality from the following options:
- Good: This option offers a balance between quality and data usage.
- Better: This option provides a higher quality than “Good” but uses more data.
- Best: This option provides the highest quality streaming experience but uses the most data.
Importance of Adjusting Video Quality for Better Viewing Experience
- Bandwidth Optimization: By changing the level of the video, users can get the most out of their bandwidth based on their internet speed and data limits. Lowering the video quality can cut down on buffering and make playback smoother, especially in places where internet links are slow or unstable.
- Consistent Streaming: If your internet speed changes a lot, the video quality will change and playing will be interrupted. Users can get a more stable streaming experience with fewer stops, buffering, and quality drops by changing the video quality.
- Adapting to the Capabilities of the Device: Screen sizes, resolutions, and processing speeds change from device to device. By changing the video quality, users can make the watching experience fit the needs of their device, ensuring the best possible playback and image quality.
- Improved Playback Stability: Lowering the video quality can make viewing more stable, especially during busy times or on networks that are already full. By lowering the bandwidth needs, users can keep the network from getting too busy and enjoy smoother playing with fewer breaks or delays.
- Faster Loading Times: Loading times are faster because lower-quality video streams usually have smaller file sizes. This means that they load faster and start playing more quickly. This can help people find the content they want faster and cut down on the time they have to wait before they can start watching.
- Compatibility with Older Devices: High-resolution video streams may not work well on older devices or devices with limited processing power. Setting the video quality to a lower resolution makes it work with more devices, so people can stream material on older or less powerful devices without any problems.
Conclusion
To sum up, it’s easy to change the video quality settings on Amazon Prime Video, which can make watching your favorite shows and movies a lot better. You have more control over your watching experience if you know how to use this feature. You can save data, make sure your videos play smoothly on different devices, or just get the best picture possible.
This is true whether you’re watching them on the go or at home for a movie satiate. You’re in charge of your own entertainment trip and can make sure you get the most out of every show. There is an easy way to improve your watching experience and make sure you’re getting the best picture possible on Amazon Prime Video, no matter where you are or what device you’re using. Adjusting the video quality will make streaming more enjoyable.
Question and Answer
Does adjusting video quality affect my data usage?
Changing the video quality have an impact on the amount of data that you consume. With higher quality, more data is used, while with lower quality, less data is used. Opt for a lower quality or use the “Data Saver” feature when streaming in order to save data.
Can I adjust video quality while offline?
You are only able to alter the video quality for streaming online; you cannot change it for offline downloads. When you download videos, the quality of the videos typically remains unchanged from the time you downloaded them; there are no alternatives to change the quality.
Can I adjust video quality on the Amazon Prime Video app for mobile devices?
Indeed! While you are watching content on the Amazon Prime Video app for mobile, you have the ability to easily adjust the video quality. During playing, you simply open the settings menu and select the quality that you prefer, just like you would on other devices.
You Might Be Interested In


Leave a Reply