2
Do you know how to Create a 3D Effect in Photoshop? When it comes to photo editing software, Adobe Photoshop, which is more commonly referred to as Photoshop, is one of the most well-known and influential options available. One of the most difficult pieces of software for editing photographs is this one. For those who are willing to put in the effort to learn how to use this programme, it takes a high level of skill but offers a high reward.
You have arrived at the right location if you are just beginning your career as an editor and are interested in expanding your skills in this area. Creating images that are realistic is a difficult task, especially when using software that is so advanced because of its complexity. On the other hand, we are here to make the process of learning significantly more expedient and simpler to comprehend. If you would like to learn how to Create a 3D Effect in Photoshop, please continue scrolling down below.
What is a 3D Effect in Photoshop?
Two dimensions—length and width—are used in the production of photographs and videos. On a level surface, we project the world that actually exists. The fact that the flat surface is a screen or a piece of photo paper is irrelevant to the investigation. Our perception of the world, however, is three-dimensional. Deepness is the dimension that is lacking.
To achieve the illusion of depth, photographers employ a wide variety of compositional techniques. But there is an additional approach. We are able to create a three-dimensional illusion in the brain. Through the process of offsetting two images of different colours, typically red and blue (cyan), we are able to create a 3D movie effect. Because of the way in which we offset colours in the image, a 3D movie effect is sometimes referred to as a red-blue 3D effect and vice versa.
How to Create a 3D Effect in Photoshop
- Choose the layer you want to turn into a 3D shape in a 2D image that you have opened.
- There are many shapes you can choose from, such as a donut, sphere, cone, cube, cylinder, soda can, or wine bottle.
- Photoshop will make a 3D layer with the new mesh and use the original grayscale or colour layer to make texture maps for the 3D object.
- You can use the Photoshop Animation timeline to move the 3D object through space or change how it looks over time by animating properties like the position of the object or camera and the render settings.
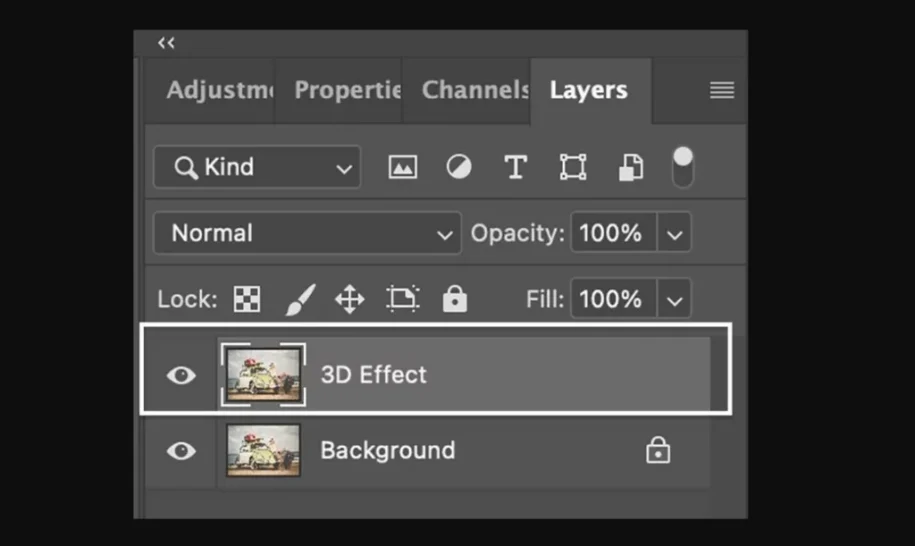
- To quickly make a simple 3D effect, you can copy the image layer, turn on and off the green and blue channels in the Layer Style box, and move the new layer away from the original layer while holding down the Shift key.
| Tool/Feature | Description |
|---|---|
| 3D Models | Import and manipulate 3D models within Photoshop for incorporation into designs. |
| 3D Text | Create and edit 3D text with various fonts, extrusions, materials, and lighting. |
| 3D Extrusion | Apply depth and volume to 2D shapes or text to convert them into 3D objects. |
| 3D Materials | Customize surface properties such as texture, shine, reflection, and transparency. |
| Lighting | Adjust and position multiple light sources to illuminate 3D scenes realistically. |
| Rendering | Generate high-quality 3D renders with options for resolution, quality, and effects. |
| Camera Tools | Control the viewpoint and perspective of the 3D scene using various camera tools. |
| Scene Management | Organize and manage multiple 3D objects, lights, and cameras within a scene. |
| 3D Printing | Prepare 3D models for printing by optimizing geometry, scale, and orientation. |
| UV Mapping | Unwrap 3D models to create 2D texture maps for precise texture placement and |
Advanced Tips and Tricks for Enhancing 3D Effects
- Utilize Depth of Field (DOF): Simulate real-world camera effects by adding depth of field to your scenes. This blurs objects in the foreground and background, focusing attention on the main subject. Adjusting the focal length and aperture settings can give your 3D renderings a more cinematic look.
- Use Ambient Occlusion (AO): Ambient occlusion simulates the soft shadows that occur in crevices and corners where ambient light has difficulty reaching. Applying AO to your 3D models can add depth and realism by enhancing the contrast between surfaces.
- Experiment with Subsurface Scattering (SSS): SSS simulates the way light scatters beneath the surface of semi-translucent objects like skin, wax, or certain types of plastics. This effect can add a level of realism to materials, making them appear more organic and lifelike.
- Employ Advanced Lighting Techniques: Experiment with different types of lighting setups such as HDR environment maps, area lights, and image-based lighting (IBL). These techniques can produce more realistic lighting conditions and help you achieve desired moods and atmospheres.
- Master Texture Mapping: Understanding UV mapping and texture painting techniques can greatly enhance the realism of your 3D models. Utilize high-resolution textures, bump maps, displacement maps, and normal maps to add intricate details to surfaces without increasing polygon count.
- Utilize Physically Based Rendering (PBR): PBR workflows aim to simulate real-world material properties accurately. Familiarize yourself with PBR shaders and material systems in your chosen 3D software to achieve more realistic results.
Conclusion
Are you curious about how to make an image appear three-dimensional in Photoshop? It is possible for even novices to complete the task if they follow the six steps that are described below. This tutorial can also be utilised when working with videos, as a matter of fact. In Photoshop 2021 and earlier versions, we will demonstrate how to create a retro 3D movie effect that is red and blue in colour.
By superimposing two images, one with a red filter and the other with a cyan filter, it is possible to generate a three-dimensional image. The term for this type of image is an anaglyph. The anaglyph glasses, which are the kind that you probably got when you were a kid and went to a 3D movie, have a red lens and a blue lens that correspond to the images that have been filtered.
Questions and Answers
What is 3D animation in Photoshop?
You are able to create 3D animations by utilising the Photoshop Animation timeline. These animations can move a 3D model through space and change the way it displays over the course of time. Each of the following properties of a 3D layer is capable of being animated by the user: 3D object or camera position. In order to move the model or the 3D camera over time, you can make use of the 3D position or camera tools.
What is 3D menu in Photoshop?
Working with three-dimensional objects is made simpler for you by the Photoshop 3D panel, which is included in Photoshop. This 3D panel is structured as a scene graph or tree, with root objects and child objects. It is modelled after the Layers panel, which is structured similarly. Interacting with three-dimensional objects in the scene graph can be done in a number of different ways, including deleting objects.
What is 3D rendering in Photoshop?
Creating a photorealistic two-dimensional image from a three-dimensional model is what is known as “3D rendering.” Following the creation of models of objects, the texturing of those objects, and the addition of lighting to the scene, the final step in the process of 3D visualisation is the rendering of the scene in three dimensions.
You Might Be Interested In


Leave a Reply